Heos Color Shift
Heos ColorShift is a Lua script for Aseprite that animates a color in your artwork as it transitions through one or more target colors. Perfect for flash effects, palette cycling, wipes, glints, animated bands, and any recolor effect that needs to run over time.
It composites all visible layers per frame, finds every pixel matching your source color, and paints the recolored result on a dedicated overlay layer, leaving your original art untouched underneath.
Workflow
1. Set source: Click the Source swatch and pick the color from your art with the eyedropper.
2. Set stops: Click Colors... and define one or more target colors the source will travel through.
3. Choose a pattern: Select Uniform, Wipe, Band gradient, or Band stripes in the Pattern tab.
4. Adjust animation: In the Animation tab, set Frames, Repeat, Direction, Speed, Easing, and FPS.
5. Generate: Press Allons-y! The Heos_ColorShift layer is created or replaced with the animation.
6. Variants: Rename the layer or change the Layer name field to start a new variant. Multiple variants can coexist as separate layers.
7. Clear: Press Clear to remove the current layer and any extra frames it added.
How ColorShift Works
On each frame, the script composites every visible layer and group into a flat image. It scans that composite for pixels that match the source color within the set Tolerance. Those pixels are recolored and written to a transparent overlay layer named Heos_ColorShift, while everything underneath stays intact. Running the script again replaces the overlay cleanly.
Source: the specific color in your art that will change. Use the eyedropper to grab it from the canvas.
Stops: the sequence of target colors the source travels through, in order. Up to 12 stops. Frame 0 is always the original untouched art; stops are spread evenly across the animation.
Overlay layer: the script never touches your original layers; all color changes live in Heos_ColorShift on top. Hide the overlay to see the original.
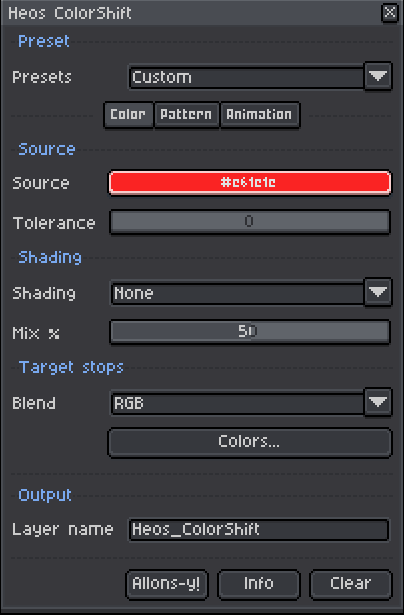
Color Tab Parameters
Source: the color to recolor. Click the swatch, then eyedrop from your art.
Tolerance: how far from the source color a pixel can be and still match. Useful for near-shades and antialiased edges. Range 0 to 255.
Shading: controls how original shading and detail are preserved during the recolor. None applies the target color flat with no information from the original pixel. Tint takes the hue and saturation from the target stop but keeps the brightness and shape of each original pixel — perfect for clean recoloring while preserving form. Keep adds the brightness difference of each pixel back to the target stop, preserving all the original shading and detail — recommended for armor, metal, or detailed art with white or light-colored stops. Multiply blends by multiplication, darkening and adding shadow color while preserving texture. Screen is the opposite: brightens and adds light or glow color, ideal for glints, energy, and highlights. Mix blends a percentage between the original and target color, controlled by the Mix % slider. Fade starts with the original color and progressively flattens toward the target stop as the animation plays, creating a dissolving effect.
Mix %: blend amount when using Mix shading mode. Range 0 to 100; 0 = all original, 100 = all target.
Blend: RGB blends channels linearly. HSV interpolates through hue, giving smoother color-wheel transitions, better for rainbow or cycle effects.
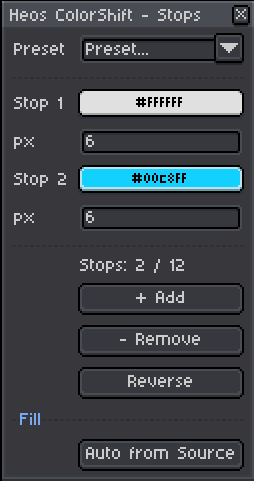
Colors Window
Opened with the Colors... button. Defines the target stop sequence the source will animate toward.
Preset: applies a ready-made color palette (Pure rainbow, Fire, Ice, Ocean, Cyber, Aurora, and 14 others).
Stop 1 to 12: each stop is a color swatch with an alpha channel. Lower alpha makes that stop semi-transparent; use this for fade-out effects.
px: per-stop thickness in pixels, used only in Band stripes mode to set how wide each color stripe is.
+ Add / - Remove: increase or decrease the number of active stops (minimum 1, maximum 12).
Reverse: flips the order of all active stops.
Auto from Source: fills the stops with light-to-dark shading variations of the source color.
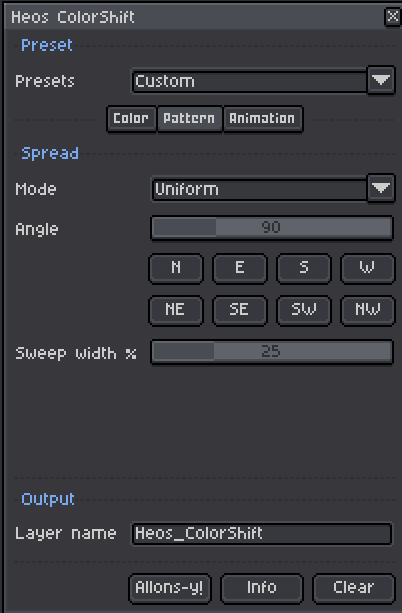
Pattern Tab Parameters
Controls how the color change is distributed across the canvas.
Mode: Uniform changes all matching pixels at once as a global fade. Wipe moves a front across the image that reveals the new color and leaves it. Band gradient moves a soft stripe across the image (glint effect). Band stripes scrolls hard-edged color bands with per-stop pixel width.
Angle: direction of the wipe or band sweep in degrees. 0 is East, 90 is North, 180 is West, 270 is South. Use the N / E / S / W and NE / SE / SW / NW buttons for quick access to cardinal and diagonal directions.
Sweep width %: controls the softness or sharpness of the wipe edge (Wipe and Band gradient). Lower values make a tighter, harder edge; higher values spread the gradient over more of the canvas.
Animation Tab Parameters
Controls timing and motion of the animation.
Repeat: Once plays through once and stops. Ping-pong plays forward then backward. Loop creates a seamless cycle.
Direction: Forward or Reverse plays the animation in either order.
Frames: total number of frames generated. Range 2 to 240.
Speed ×: multiplier for how fast the change occurs. × 1 spreads the change evenly across all frames. × 2 completes it in half the frames and then holds. Higher values compress the animation for snappy effects.
Easing: shape of the animation curve. Linear keeps constant speed. Ease in starts slow and accelerates. Ease out accelerates then slows. Ease in-out creates a smooth S-curve.
FPS: frame rate applied to newly generated frames. If your sprite already had multiple frames, their original durations are left unchanged.
Presets
The Presets dropdown at the top of the dialog sets all parameters at once to a themed configuration. You can adjust anything after applying.
Fade to color: uniform fade to blue over 12 frames.
Silhouette: flattens the whole art to black using Fade shading, creating a clean silhouette transition.
Flash: fast 6-frame ping-pong white flash with Screen shading for brightness.
Pulse: slower 20-frame white pulse with Screen shading.
Armor shine: white glint with Keep shading, preserving the look of armor or metal.
Electric: cyan-to-white electric ping-pong flash with Fade shading.
Poison throb: green tone pulse with Multiply shading for colored shadow effect.
Ghost fade: fades to fully transparent white using Screen shading, creating a ghosting effect.
Color cycle: seamless HSV rainbow loop across 6 stops over 24 frames with Multiply shading.
Wipe to color / Wipe diagonal / Wipe up: directional wipe reveals in three orientations.
Diagonal glint / Horizontal shine / Vertical scan / Shine sweep: Band gradient effects for highlight sweeps and scan lines.
Rainbow / Rainbow band / Barber pole / Stripe scroll / Fire flow: Band stripes presets for scrolling color patterns.
Selection & Region
If you have an active selection in Aseprite, the script scans and recolors only within that area. The overlay layer still covers the full canvas, but pixels outside the selection are left transparent. Without a selection, the whole canvas is processed.
Compatibility
Requires Aseprite 1.3.x or later. RGB color mode only. Indexed and Grayscale sprites are not supported.
Tips
Use the eyedropper on the Source swatch to grab the exact color from your art. If pixels are not matching, raise Tolerance a little to catch antialiased edges or near-shades of the same color.
Tint shading is ideal for clean palette remapping in pixel art: the target color takes on the brightness and form of each original pixel, perfect for recolors that stay readable. Keep shading works well for detailed art with lighting or multiple shades; it preserves all the original shading detail. Multiply and Screen are great for overlay effects: Multiply adds shadow and darkens, Screen adds light and brightens. Mix gives you direct control over the blend percentage. Fade works well for transitions that dissolve the art into a solid shape.
Speed × lets you control the pacing: low values (× 1) spread the change smoothly, higher values (× 3+) create snappy, instant-looking effects that then hold. Combine with Easing to fine-tune the feel: Ease in-out creates a professional S-curve, while Linear keeps constant speed throughout.
In Band stripes mode, set the px value per stop in the Colors window to control how wide each stripe is. Unequal widths give more varied, hand-painted patterns. Combine with Ping-pong or Loop for continuous scrolling effects.
To create multiple color variants of the same art: generate a recolor, then rename the layer (or change the Layer name field). Generate again with different stops — the new layer is created separately. Toggle each layer on and off to compare variants. Press Clear to remove a single variant without affecting the others.
Press Clear before re-running if you want to start fresh; otherwise the script regenerates the overlay in place, respecting any frames added by other variants or your original animation.
Examples
Original:
Effects:


If you change a color, rename the layer, and try another color, you can create some really cool transformations:
Possible combinations with Heos Shatter and Heos Melt:

Feedback & Support
I love seeing how you use Heos ColorShift in your projects. If you have questions, ideas, or just want to share what you've made, feel free to leave a comment or reach out directly. It's always great to see your work in action.

If you found this tool useful, taking a moment to leave a rating really helps. Thanks for the support.
Purchase
In order to download this tool you must purchase it at or above the minimum price of $2.67 USD. You will get access to the following files:


Leave a comment
Log in with itch.io to leave a comment.